

Are you dealing with cracks, holes, or water damage on your plaster walls?
This article will explore the different types of plaster walls, common problems that arise, and the tools and materials needed for repairs.
We will provide you with a step-by-step guide on how to patch holes and cracks, repair water damage, and offer tips on maintaining your plaster walls.
Stay tuned to learn how to restore the beauty of your walls!
Types Of Plaster Walls
Understanding the different types of plaster walls, such as Lime Plaster, Gypsum Plaster, and Cement Plaster, can help in selecting the most suitable option for a specific project.
Each type of plaster has unique characteristics that make it suitable for different applications. Lime plaster is known for its traditional appeal, breathability, and durability, making it ideal for historic restoration projects. Gypsum plaster, on the other hand, offers excellent fire resistance and is commonly used in modern construction for its smooth finish and ease of application.
Lastly, Cement plaster is preferred for its strength and water resistance, making it a popular choice for exterior walls and damp areas like bathrooms and kitchens.
Lime Plaster
Lime plaster is a traditional type of plaster known for its breathable and flexible nature, making it ideal for historic restoration projects and creating a smooth finish on walls.
Composed of hydrated lime, water, and sometimes additives like sand or fibers, lime plaster is applied in multiple coats to achieve the desired thickness and texture. The material chemically reacts with carbon dioxide in the air, transforming into calcium carbonate and forming a durable protective layer. Techniques such as troweling, floating, and rubbing are used to create different finishes, ranging from slick to textured surfaces.

Gypsum Plaster
Gypsum plaster is a modern plaster type that is easy to work with, often used in drywall finishing and repair projects due to its compatibility with joint compounds for seamless patching.
One of the key characteristics of gypsum plaster is its excellent fire resistance, making it a suitable choice for both residential and commercial structures. Gypsum plaster has great sound insulation properties, providing a quieter environment. When applying gypsum plaster to repair walls, it is essential to mix it with water to achieve a workable consistency.
Interaction with joint compounds is crucial for a smooth finish. Gypsum plaster blends seamlessly with joint compounds, creating a cohesive surface that is ready for painting or wallpaper application. Patching cracks or holes with gypsum plaster involves filling the damaged areas with the plaster mix and then smoothing it out with a trowel for a uniform appearance. Once the patched area dries, sanding may be needed to achieve a perfectly smooth finish.

Cement Plaster
Cement plaster, a durable and strong option, is commonly used for exterior walls and in areas requiring a tough coating, providing a solid base for further finishes on lath or masonry walls.
One of the key attributes of cement plaster is its ability to withstand external elements, making it ideal for protecting structures against harsh weather conditions and wear and tear. The application of cement plaster involves mixing cement, sand, and water to create a thick paste that can be easily spread and leveled on surfaces.
When applied to lath structures, cement plaster adheres well, creating a smooth and even surface that is ready for additional layers of paint or decorative finishes. It serves as a crucial base layer, enhancing the durability and longevity of the overall wall structure.
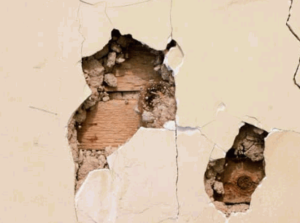
Common Problems With Plaster Walls
Plaster walls commonly encounter issues such as cracks, holes, and water damage, requiring timely repairs to maintain the structural integrity and aesthetics of the surface.
These problems can arise due to various factors, including the settling of the building, changes in humidity levels, or even just the natural aging of the material.
Cracks can develop from the shifting of the foundation or temperature fluctuations, while holes may occur from accidental impacts or wear and tear over time.
Water damage is often a result of leaks or seepage, leading to not only unsightly stains but also weakening the plaster and potentially causing mold growth.
Addressing these issues promptly is crucial to prevent further deterioration and maintain the overall strength and appearance of the walls.
Cracks
Cracks in plaster walls can be addressed by patching the affected areas with appropriate materials, followed by sanding for a smooth finish, especially when dealing with drywall surfaces.
When tackling cracks in plaster walls, the first step is to gather the necessary materials, including a putty knife, patching compound, sandpaper, and primer.
- Begin by cleaning the area around the crack to remove any loose debris and dust.
- Use the putty knife to apply the patching compound smoothly over the crack, ensuring it fills the gap completely.
- Allow the compound to dry as per the manufacturer’s instructions before sanding it down carefully to create a seamless surface.
After sanding, apply a coat of primer to the patched area for better adhesion of the paint or wallpaper that will follow, blending it with the surrounding wall for a seamless finish.

Holes
Holes in plaster walls require filling with layers of patching materials using a putty knife, ensuring a gradual application process to achieve seamless integration with the surrounding surface.
- Start the repair process by clearing out any loose debris or old patching material around the hole to create a clean surface for the new patch.
- Apply a base layer of the patching compound using the putty knife, ensuring it covers the hole completely and slightly overlaps with the surrounding area.
- Let the base layer dry according to the manufacturer’s instructions before applying subsequent layers for a sturdy repair.
- After each layer, use the putty knife to feather the edges smoothly to blend the patch with the wall surface.
Water Damage
Water damage on plaster walls necessitates a thorough repair process, involving the mixing of appropriate compounds and the implementation of safety precautions such as wearing goggles for protection.
When addressing water damage on plaster walls, it is crucial to begin by assessing the extent of the damage to determine the appropriate repair solution. Once the assessment is complete, a mixture of plaster repair compound and water should be prepared according to the manufacturer’s instructions. Consistency in the mixture is key to ensuring a smooth and durable repair.
Safety measures must be strictly adhered to during the repair process. Wearing safety goggles is essential to protect the eyes from any dust or debris that may be released during the repair work. Proper ventilation in the area is also important to prevent the inhalation of harmful particles.

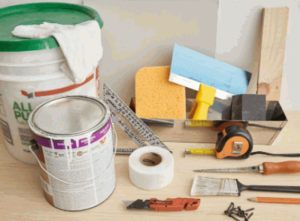
Tools And Materials Needed For Repairing Plaster Walls
Repairing plaster walls requires specific tools and materials such as putty knives, sandpaper, and repair compounds, along with protective gear like safety goggles and clothes for cleaning.
Putty knives are essential for spreading and smoothing repair compounds, ensuring a seamless finish on the repaired area. Fine-grit sandpaper helps in sanding down rough patches and achieving a smooth texture for blending in the repaired section with the rest of the wall. Repair compounds are used to fill in any cracks or holes in the plaster, providing a sturdy foundation for the wall’s surface.
Protective gear, like safety goggles, shields your eyes from debris while working on the repair, ensuring safety and preventing any accidents. Cleaning cloths are necessary to wipe down the walls before and after repairs, maintaining a clean and dust-free surface for better adhesion of the repair materials.
Explore further: How To Clean Plastering Tools
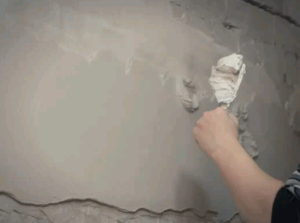
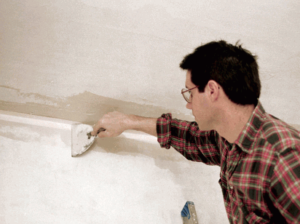
Step-By-Step Guide For Repairing Plaster Walls
A detailed step-by-step guide for repairing plaster walls can assist in navigating through the process effectively, ensuring a successful restoration of the damaged areas.
Before starting the repairs,
- Survey the damaged plaster walls to determine the extent of the damage.
- Remove any loose or crumbling plaster using a putty knife.
Preparation is key to the success of the repair process. Next, apply a bonding agent to the exposed lath or masonry to ensure proper adhesion of the new plaster. Once the bonding agent has dried, mix the plaster patching compound according to the manufacturer’s instructions.
- Apply the plaster patch evenly over the damaged area, smoothing it out with a trowel.
- Allow the patch to dry completely before sanding it down with fine-grit sandpaper.
Sanding helps to achieve a smooth finish and blend the patch with the surrounding plaster walls seamlessly. Finish off by priming and painting the repaired area to match the existing wall color.
Prepare The Area
Preparing the repair area involves clearing the space, following manufacturer guidelines for product usage, and ensuring adequate ventilation in the room for a safe and efficient repair process.
Clearing the space involves removing any furniture, decorations, and other obstacles that could hinder the repair work. It is crucial to have a clean and spacious area to maneuver easily.
Following the manufacturer’s guidelines for product usage is essential for achieving the best results and ensuring the longevity of the repaired plaster. This includes proper mixing ratios, application techniques, and drying times for the specific product being used.
Optimizing the repair environment further involves creating a comfortable working atmosphere. Adequate ventilation helps in drying the plaster efficiently and prevents the buildup of fumes, ensuring the safety of the repair process. Setting up adequate lighting and having the necessary tools and materials within reach can significantly streamline the repair job.
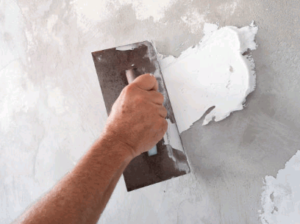
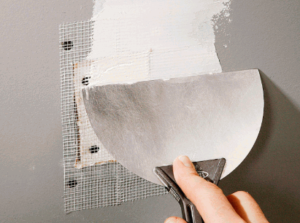
Patching Holes And Cracks
Patching holes and cracks in plaster walls involves applying suitable compounds, reinforcing with tape if needed, and smoothing the patched areas for seamless integration with the wall surface.
One effective method for patching smaller holes in plaster walls is to first clean the area by removing loose debris and dust. Next, cut a piece of fiber or mesh tape slightly larger than the hole and press it into place over the damaged area to provide reinforcement. Then, mix a small amount of patching compound following the manufacturer’s instructions and apply it over the tape using a putty knife.
Ensure that the compound is spread evenly and slightly feathered out towards the edges to blend with the surrounding wall texture. Allow the patch to dry completely before sanding it down gently to achieve a smooth surface. For larger cracks, it may be necessary to widen the gap slightly with a putty knife before applying the tape and compound.
Repairing Water Damage
Repairing water damage on plaster walls entails addressing the source of moisture, ensuring a smooth repair finish, and maintaining optimal room temperature for the drying and curing of the repaired areas.
Regarding mitigating the source of moisture, it is crucial to fix any leaks or issues that are causing the water damage in the first place. This step is fundamental to prevent future damage and ensure the longevity of the plaster walls. Once the source is resolved, the focus shifts to achieving a flawless finish on the repaired areas. Finishing techniques such as sanding, priming, and painting are essential to restore the walls to their original condition.
Considering environmental factors like room temperature is paramount for the drying and curing process. Optimal temperature control accelerates the drying time and helps in achieving a durable and seamless repair. It is recommended to monitor the temperature closely during the restoration process to guarantee effective results.
Tips For Maintaining Plaster Walls
Effective maintenance tips for plaster walls include regular inspections, prompt repairs of minor damages, and controlling the humidity level in the area to preserve the integrity of the walls.
Regular inspections are crucial to detect any hairline cracks or signs of moisture that could lead to more significant damage if left unattended. For quick fixes, using a mixture of plaster patching compounds can easily repair small imperfections like dents or holes. It’s essential to sand and repaint these patches seamlessly for a uniform finish. Managing the humidity levels in the room, especially in high-moisture areas like bathrooms or kitchens, can prevent the plaster from absorbing excess moisture and potentially crumbling over time. Consider using a dehumidifier or proper ventilation to maintain the ideal climate for your plaster walls.
Conclusion
Mastering the repair and maintenance of plaster walls involves understanding the material intricacies, executing seamless fixes, and completing each project with a smooth finish.
Expertise is crucial when it comes to repairing plaster walls. Understanding the specific characteristics of plaster helps in choosing the right tools and techniques for the job.
- Accuracy in mixing plaster compounds is key to achieving a durable and visually appealing finish.
- Attention to detail during application ensures a smooth and consistent surface.
Precise workmanship is needed to seamlessly blend repaired areas with the existing plaster for a flawless result. Emphasis on proper drying and curing times enhances the longevity of the repair, maintaining the integrity of the wall.